
Installation af elcykelkonverteringssæt: En trin-for-trin-guide
Elcykelkonverteringssæt er blevet mere og mere populære, da flere cyklister ønsker at forbedre deres køreoplevelse uden at investere i en helt ny elcykel. Disse sæt gør det muligt at omdanne traditionelle cykler til elcykler, hvilket giver en effektiv og miljøvenlig transportform. Kernen i elcykelkonverteringssæt er typisk en motor, et batteri, en controller og forskellige tilbehør, der er nødvendige til installation.
Motoren kan monteres forskellige steder, f.eks. på forhjulsnavet, baghjulsnavet eller endda på cyklens kranksæt, som hver især tilbyder forskellige fordele og udfordringer. Valget af konverteringssæt afhænger ofte af rytterens specifikke behov og den type cykel, der konverteres. For eksempel er navmotorsæt populære på grund af deres nemme installation og minimale vedligeholdelseskrav.
De giver en jævn kørsel og er generelt mere støjsvage end andre typer motorer. Omvendt er centermotorer foretrukne på grund af deres overlegne ydeevne i bakket terræn og deres evne til at udnytte cyklens gear effektivt. Det er afgørende at forstå disse forskelle for at vælge det rigtige kit, der passer til din kørestil og det terræn, du planlægger at navigere i.
Vigtige konklusioner
- Elcykelkonverteringssæt kan forvandle din almindelige cykel til en elektrisk cykel, hvilket giver en miljøvenlig og omkostningseffektiv transportmulighed.
- Det er vigtigt at samle de nødvendige værktøjer og materialer, såsom et konverteringssæt, batteri og grundlæggende håndværktøj, for en vellykket konverteringsproces.
- Forberedelse af din cykel til ombygning indebærer at fjerne de eksisterende komponenter, såsom forhjul og bremser, for at give plads til de nye elektriske komponenter.
- Installation af elcykelkonverteringssættet kræver nøje følging af producentens instruktioner og sikring af, at alle komponenter er sikkert fastgjort til cyklen.
- Test og fejlfinding af elcyklen efter installation er afgørende for at sikre, at alt fungerer korrekt, og for at løse eventuelle problemer, der måtte opstå.
- Sikkerhedstips og vedligeholdelse efter installation, såsom regelmæssige inspektioner og korrekt batteripleje, er vigtige for at sikre din elcykels levetid og sikkerhed.
Indsamling af nødvendige værktøjer og materialer
Grundlæggende nødvendige værktøjer
Grundlæggende værktøjer, der typisk kræves, inkluderer et sæt skruenøgler, skruetrækkere, en momentnøgle og muligvis en cykelholder for stabilitet under konverteringen.
Yderligere værktøjer og materialer
Med hensyn til materialer, udover selve elcykelkonverteringssættet, kan du have brug for yderligere ting såsom elektrikertape, kabelbindere til kabelhåndtering og muligvis nye bremsegreb, hvis dit sæt kræver det.
Forberedelse er nøglen
Forberedelse af disse værktøjer og materialer på forhånd strømliner ikke blot installationsprocessen, men minimerer også risikoen for afbrydelser, der kan føre til frustration eller fejl.
Klargøring af din cykel til ombygning
Forberedelse af din cykel til ombygning er et afgørende trin, der lægger grundlaget for en vellykket installation. Start med at inspicere din cykel grundigt for at sikre, at den er i god stand. Kontroller stellet for tegn på skader eller slid, da et kompromitteret stel kan påvirke din elcykels samlede ydeevne.
Derudover skal du inspicere hjul, bremser og drivlinjekomponenter for at sikre, at de fungerer korrekt. Hvis nogen dele er slidte eller beskadigede, bør du overveje at udskifte dem, før du fortsætter med ombygningen. Når du har bekræftet, at din cykel er i god stand, er det tid til at rengøre den grundigt.
En ren cykel gør ikke kun installationsprocessen nemmere, men hjælper også med at forhindre snavs og skidt i at forstyrre elektriske komponenter. Vær særlig opmærksom på områder, hvor du skal arbejde, såsom hjulnav eller kranksæt. Efter rengøring er det tilrådeligt at fjerne alt unødvendigt tilbehør eller komponenter, der kan blokere installationsprocessen, såsom skærme eller bagagebærere, der kan forstyrre motorens placering.
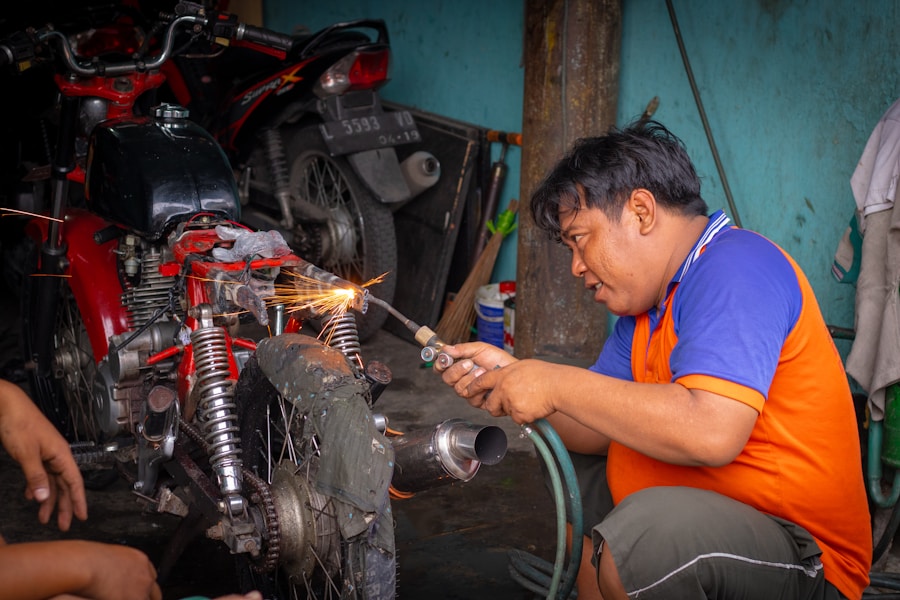
Installation af elcykelkonverteringssættet
| Målinger | Værdi |
|---|---|
| Pris på konverteringssæt | 300 |
| Installationstid | 2-4 timer |
| Forøgelse af rækkevidde | 20-30 miles |
| Tophastighed | 20-25 mph |
| Batterilevetid | 48-65 km pr. opladning |
Installationsprocessen for et elcykelkonverteringssæt kan variere betydeligt afhængigt af den valgte type sæt. For navmotorsæt involverer det første trin typisk at fjerne forhjulet eller baghjulet fra din cykel. Når hjulet er af, kan du udskifte det med det motoriserede hjul, der følger med dit sæt.
Dette kræver normalt at du flytter dækket og slangen fra dit originale hjul til det nye, hvilket kan involvere brug af dækjern og en pumpe for at sikre, at alt sidder korrekt. For centerdrevsmotorsæt er installationen mere kompleks, da det ofte kræver, at cyklens kranksæt og krankboks fjernes. Denne proces kan involvere brug af specialværktøj som en krankaftrækker eller et krankboksværktøj.
Efter montering af motoren på stellet skal du tilslutte den til cyklens kædesystem og sørge for, at den er korrekt justeret i forhold til gearene for optimal ydeevne. Uanset hvilken type sæt der monteres, er det afgørende at følge producentens instruktioner nøje for at undgå fejl, der kan føre til ydeevneproblemer eller sikkerhedsrisici.
Test og fejlfinding
Når installationen er færdig, er det vigtigt at teste din nykonverterede elcykel for at sikre, at alt fungerer som tilsigtet. Start med at kontrollere alle elektriske forbindelser for at bekræfte, at de er sikre og korrekt isolerede. Tænd systemet, og se om displaypanelet lyser og viser relevante oplysninger såsom batteriniveau og hastighedsindstillinger.
Hvis der er problemer på dette tidspunkt, skal du se i din installationsmanual for at få tips til fejlfinding specifikt for dit sæt. Når du har bekræftet, at alle elektriske komponenter fungerer korrekt, skal du tage en kort prøvetur på din cykel i et sikkert område væk fra trafik. Vær opmærksom på, hvordan motoren aktiveres, når du træder i pedalerne, og om der er usædvanlige lyde eller vibrationer.
Hvis du oplever problemer under denne prøvetur – såsom strømsvigt eller uregelmæssig motoropførsel – skal du vende tilbage til din arbejdsplads og dobbelttjekke alle forbindelser og indstillinger. Det kan også være nødvendigt at kalibrere visse komponenter igen eller justere indstillingerne på controlleren for at optimere ydeevnen.
Sikkerhedstips og vedligeholdelse efter installation
Sikkerhed bør altid være en topprioritet, når man kører på en elcykel, især en cykel, der er blevet ombygget fra en traditionel cykel. Først og fremmest skal du sørge for at bruge passende sikkerhedsudstyr, herunder hjelm, reflekstøj og lygter, hvis du kører om natten. Sæt dig ind i lokale love vedrørende elcykler, da reglerne kan variere betydeligt fra region til region med hensyn til hastighedsgrænser og hvor du må cykle.
Vedligeholdelse er lige så vigtigt efter installation for at sikre din elcykels levetid og optimale ydeevne. Kontroller regelmæssigt dæktryk, bremsefunktion og batteritilstand for at forhindre problemer under kørsel. Det anbefales at rengøre elektriske forbindelser med jævne mellemrum for at undgå korrosion, der kan føre til forringelse af ydeevnen over tid.
Hold desuden øje med batteriets opladningscyklusser; litium-ion-batterier holder typisk længere, når de ikke aflades helt ofte. Ved at følge disse sikkerhedstips og vedligeholdelsespraksis kan du få en pålidelig og behagelig køreoplevelse med din nyrenoverede elcykel.
Ofte stillede spørgsmål
Hvad er et konverteringssæt til en elcykel?
Et konverteringssæt til elcykler er et sæt komponenter, der kan tilføjes til en almindelig cykel for at konvertere den til en elcykel. Sættet indeholder typisk en motor, et batteri, en controller og andre nødvendige dele.
Hvad er fordelene ved at bruge et konverteringssæt til elcykler?
Ved at bruge et elcykelkonverteringssæt kan du opgradere din eksisterende cykel til en elcykel, hvilket giver fordelene ved assisteret pedalering, øget hastighed og muligheden for at klare bakker og længere distancer med lethed.
Hvad er installationsprocessen for et elcykelkonverteringssæt?
Installationsprocessen for et elcykelkonverteringssæt involverer typisk montering af motoren på cykelstellet, montering af batteri og controller, tilslutning af ledningerne og justeringer for at sikre korrekt funktionalitet.
Har jeg brug for specialværktøj eller færdigheder for at installere et konverteringssæt til en elcykel?
Selvom installationsprocessen kræver nogle grundlæggende mekaniske færdigheder og værktøjer, er mange elcykelkonverteringssæt designet til at være brugervenlige og kan installeres ved hjælp af instruktionsvideoer eller manualer.
Kan jeg installere et elcykelkonverteringssæt på enhver type cykel?
De fleste elcykelkonverteringssæt er designet til at være kompatible med en bred vifte af cykeltyper, herunder mountainbikes, racercykler og cruisers. Det er dog vigtigt at sikre, at sættet er kompatibelt med din specifikke cykel, før du foretager et køb.
Er der nogen sikkerhedshensyn, man skal huske på under installationsprocessen?
Det er vigtigt at følge producentens anvisninger nøje og sikre, at alle komponenter er sikkert monteret og tilsluttet. Derudover anbefales det at bære beskyttelsesudstyr og tage de nødvendige forholdsregler, når man arbejder med elektriske komponenter.